OpenWrt's Microbus, ubus in Ubuntu
In the realm of Linux system software, there is always a constant thirst for improvements. One architecture replaces the other, along the paradigm shift in the resources availability and to cope with the new technologies. With the foreword, there are quite a lot of bus architectures available around Linux based systems.
D-Bus is one of the prominent among them. The default bus system in the Ubuntu systems and in many of the other flavors of Linux systems be it both general purpose desktops or embedded platforms. In the light of router world explorations, one of the lightweight bus systems from the popular OS OpenWrt is actually so tiny that it is called microbus, ubus.
OpenWrt has been in the wireless router industry for more than two decades. And it’s basic infrastructure like ubus made it stronger. In this article, ubus will be made to run in Ubuntu based systems. This facilitates the development of the ubus based applications can be run on Ubuntu itself, so that the development and testing environment need not rely on the real hardware devices.
In order to keep your laptops (or) PCs saner, using docker for the development environment.
Setting Up Docker Environment
Docker can be installed in the Ubuntu systems using the below instructions.
~$ sudo apt update
~$ sudo apt install apt-transport-https ca-certificates curl software-properties-common
~$ curl -fsSL https://download.docker.com/linux/ubuntu/gpg | sudo gpg --dearmor -o /usr/share/keyrings/docker-archive-keyring.gpg
~$ echo "deb [arch=$(dpkg --print-architecture) signed-by=/usr/share/keyrings/docker-archive-keyring.gpg] https://download.docker.com/linux/ubuntu $(lsb_release -cs) stable" | sudo tee /etc/apt/sources.list.d/docker.list > /dev/null
~$ sudo apt update
~$ sudo apt install docker-ce
~$ sudo usermod -aG docker ${USER}
~$ su - ${USER}
Once the docker is all set up, we can download the docker image for the Ubuntu and run it using a single command as below,
~$ docker run -dit --name ubus ubuntu:24.04 /bin/bash
After running the docker, usually it goes into root user, you can prefer to use the root user or create a new user.
root@258e3304795c:~#
root@258e3304795c:~#
Setting Up ubus Environment
For the ubus based application development, the environment needs to be set up. The following command helps in setting up the prerequisites of the ubus on Ubuntu.
root@258e3304795c:~# apt update && apt install libjson-c-dev liblua5.1-0-dev liblua5.1-dev lua5.1 vi nano git git-core python make cmake
The Lua library and development headers are to be set up properly. The following hack will solve the search path expectation for the Lua headers.
root@258e3304795c:~# ln -sf /usr/include/lua5.1/* /usr/include/
ubus is dependent on the libubox, the utilities box or the handyman of the
OpenWrt. Has all the core libraries, utilities, wrappers that are needed not be
re-written from scratch. ubus exploits the most out of the libubox. We can
build and install the libubox as,
root@258e3304795c:~# git clone git://git.openwrt.org/project/libubox.git
root@258e3304795c:~# cd libubox
root@258e3304795c:~/libubox# cmake .
root@258e3304795c:~/libubox# make
root@258e3304795c:~/libubox# sudo make install
Compile and Install ubus
Once all the prerequisites are installed, ubus can be compiled and installed. Applications that are bound to the ubus can be developed with the installed ubus.
root@258e3304795c:~# git clone git://git.openwrt.org/project/ubus.git
root@258e3304795c:~# cd ubus
root@258e3304795c:~/ubus# cmake -f CMakeLists.txt
root@258e3304795c:~/ubus# make
root@258e3304795c:~/ubus# sudo make install
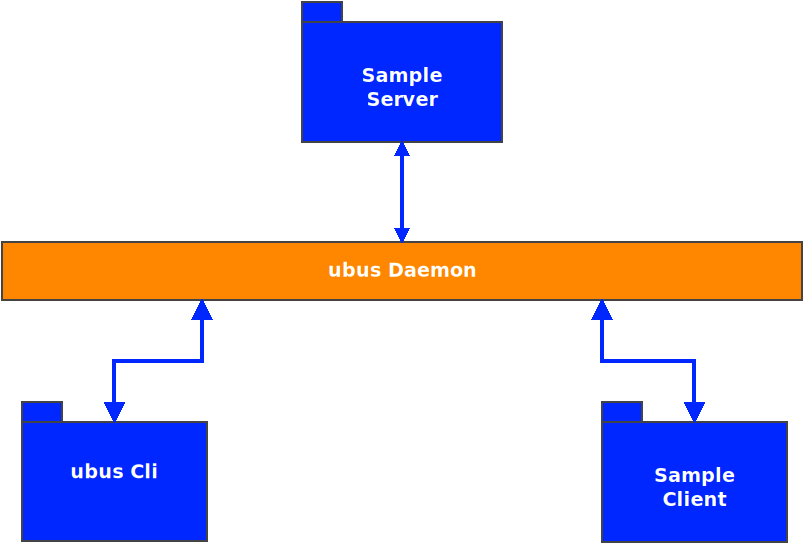
ubus comprises a daemon ubusd which is the actual bus, takes major
portion of the activity. A command line utility that interacts with the daemon,
used to manage the bus activities.
Examples from the ubus
ubus repository itself has a sample implementation of a server and client
programs, showcasing the possibilities. The server implementation, waits for the
calls from the client or ubus call with the methods. It serves the hello and
watch methods. Compile the applications by using,
root@258e3304795c:~# cd ubus
root@258e3304795c:~/ubus# cd examples
root@258e3304795c:~/ubus/examples# make
The above commands will create the server and client binaries, with this we
can proceed to run ubus on Ubuntu and get a feel of it.
Ode to Joy
To run the ubus instance on Ubuntu and to make the interactions between the ubus based example server, ubus CLI and example client.
root@258e3304795c:~/ubus# ubusd &
root@258e3304795c:~/ubus# ubus list  # will be empty as there are no providers
Calling the x-ray eye for the ubus sequence. ubus command line utility has the facility to monitor the message sequences that goes through the bus. Running the monitor in the background keeps the sequence that happens behind the screens to plain sight.
root@258e3304795c:~/ubus# ubusd monitor &
Now we can run the sample server and start interacting with it, under our x-ray vision.
root@258e3304795c:~/ubus# cd examples
root@258e3304795c:~/ubus/examples# ./server &
[3] 203
-> dfa437c6 #dfa437c6          hello: {}
<- dfa437c6 #00000000     add_object: {"objpath":"test","signature":{"hello":{"id":5,"msg":3},"watch":{"id":5,"counter":5},"count":{"to":5,"string":3}}}
-> dfa437c6 #00000000           data: {"objid":-1195474518,"objtype":-385193497}
-> dfa437c6 #00000000         status: {"status":0}
<- dfa437c6 #00000000     add_object: {}
-> dfa437c6 #00000000           data: {"objid":1039685309}
-> dfa437c6 #00000000         status: {"status":0}
We could see the registration of the objects, methods from the server sample program to ubus. With this, we can start interacting to the server using the ubus CLI and send a message using the interface. Firstly, let’s list the object paths exposed by server.
root@258e3304795c:~/ubus/examples# ubus list
-> b220cf0e #b220cf0e          hello: {}
<- b220cf0e #00000000         lookup: {}
-> b220cf0e #00000000           data: {"objpath":"test","objid":-1195474518,"objtype":-385193497,"signature":{"hello":{"id":5,"msg":3},"watch":{"id":5,"counter":5},"count":{"to":5,"string":3}}}
-> b220cf0e #00000000         status: {"status":0}
test
Let’s say a hello to the server using ubus call,
root@258e3304795c:~/ubus/examples# ubus call test hello '{"id":1,"msg":"The quick brown fox jumps over the lazy dog"}'
-> a3de43f6 #a3de43f6          hello: {}
<- a3de43f6 #00000000         lookup: {"objpath":"test"}
-> a3de43f6 #00000000           data: {"objpath":"test","objid":-1195474518,"objtype":-385193497,"signature":{"hello":{"id":5,"msg":3},"watch":{"id":5,"counter":5},"count":{"to":5,"string":3}}}
-> a3de43f6 #00000000         status: {"status":0}
<- a3de43f6 #b8be81aa         invoke: {"objid":-1195474518,"method":"hello","data":{"id":1,"msg":"The quick brown fox jumps over the lazy dog"}}
-> dfa437c6 #a3de43f6         invoke: {"objid":-1195474518,"method":"hello","data":{"id":1,"msg":"The quick brown fox jumps over the lazy dog"},"user":"root","group":"root"}
<- dfa437c6 #a3de43f6           data: {"objid":-1195474518,"data":{"message":"test received a message: The quick brown fox jumps over the lazy dog"}}
-> a3de43f6 #b8be81aa           data: {"objid":-1195474518,"data":{"message":"test received a message: The quick brown fox jumps over the lazy dog"}}
<- dfa437c6 #a3de43f6         status: {"status":0,"objid":-1195474518}
-> a3de43f6 #b8be81aa         status: {"status":0,"objid":-1195474518}
{
        "message": "test received a message: The quick brown fox jumps over the lazy dog"
}
From the above call, we can see the interactions between the server and ubus call. The message is echoed by the server. Now we can run the client and see the interactions.
root@258e3304795c:~/ubus/examples# ./client
Watching object 57e6ce44: Success
Avg time per iteration: 30 usec
Subscribers active: 1
Got fd from the server, watching...
completed request, ret: 0
Avg time per iteration: 51 usec
Got line: msg1: test received a message: blah
Sending count up to '100100'; string has length '592926'
Server validated our count up to '100100'
Got line: msg2: test received a message: blah
Avg time per iteration: 39 usec
Got line: msg3: test received a message: blah
Avg time per iteration: 52 usec
Got line: msg4: test received a message: blah
Sending count up to '100200'; string has length '593629'
Server validated our count up to '100200'
Avg time per iteration: 43 usec
Got line: msg5: test received a message: blah
Avg time per iteration: 46 usec
Got line: msg6: test received a message: blah
Sending count up to '100300'; string has length '594333'
Server validated our count up to '100300'
Avg time per iteration: 52 usec
Got line: msg7: test received a message: blah
Avg time per iteration: 45 usec
References
Conclusion
OpenWrt based application development is a niche area. With the ability to run OpenWrt’s micro bus ubus in a general purpose operating system like Ubuntu would be a big relief. This ecosystem would pave way for tremendously decreasing the time for development and unit testing of the applications.
For any services related to OpenWrt, Wireless Router Operating Systems, specific customization services like fast boot, performance improvement and security improvements on Linux, you can reach us through sales@zilogic.com.