Raspberry Pi with OpenWrt as a Wireless Router
Raspberry Pi is a single-board computer (with an ARM Cortex-A72 64-bit quad-core) made by Raspberry Pi Foundation for educative exploration. It is commonly called R-Pi/rpi for short and used by hobbyists as a mini PC and for developing embedded and IoT applications.
To build a wireless router, we need a wireless router stack, where OpenWrt is the key contender. OpenWrt is an open-source Linux-based operating system meant for networking equipment (routers, access points). And well and good that OpenWrt supports Raspberry Pi as one of the targets.
In this article we will try to run OpenWrt on RPi and transform it into a WiFi router.
Features of Raspberry Pi
-
Support OSes like Linux Ubuntu, Raspbian, OpenWrt, etc.
-
Includes I/O ports for sensor interfacing
-
Has Ethernet and WiFi for network connectivity
-
Has HDMI for connecting to displays
-
Uses an SD card as the storage medium.
-
USB for connecting peripherals
Flashing OpenWrt Image
OpenWrt periodically releases images to several target boards, including R-Pi. We can use the release image as such for our purpose.
-
Download the bcm27xx image for Raspberry Pi from OpenWrt https://downloads.openwrt.org/releases/24.10.0/targets/bcm27xx/bcm2711/openwrt-24.10.0-bcm27xx-bcm2711-rpi-4-squashfs-factory.img.gz .
-
Download balenaEtcher-linux-x64-2.1.0 from https://etcher.balena.io/#download-etcher .
-
Remove the SD card from the Raspberry Pi board and connect the SD card to the PC.
-
Flash the bcm27xx image using balenaEtcher. Reconnect the SD to the Raspberry Pi.

Test Bed Setup
The following in the test bed that we will be using for testing the Raspberry Pi as a WiFi Router.
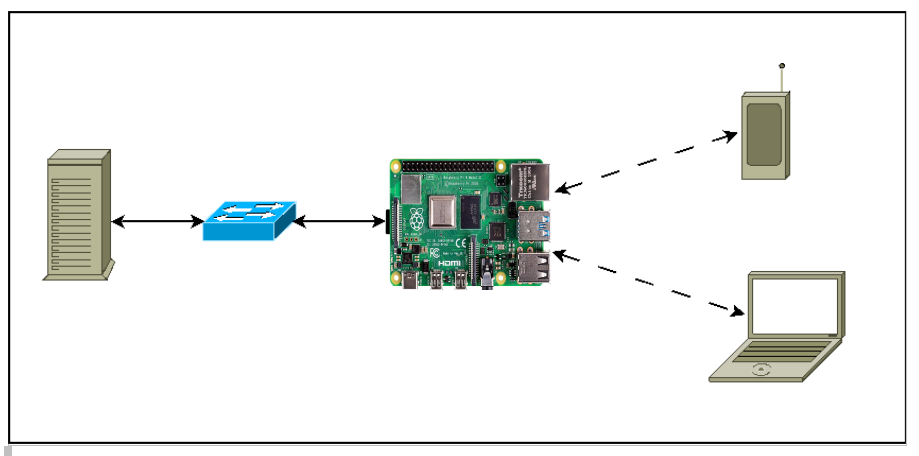
Booting OpenWrt software in Raspberry Pi
We are using the below specifications:
-
Machine model: Raspberry Pi 4 Model B Rev 1.5
-
With Quad core processor.
-
File system used in OpenWrt image EXT4 fs.
-
802.11ac is a WiFi standard that is supported in Raspberry Pi-4b.
WiFi Validation
We can validate the below features to use it as a WiFi router.
-
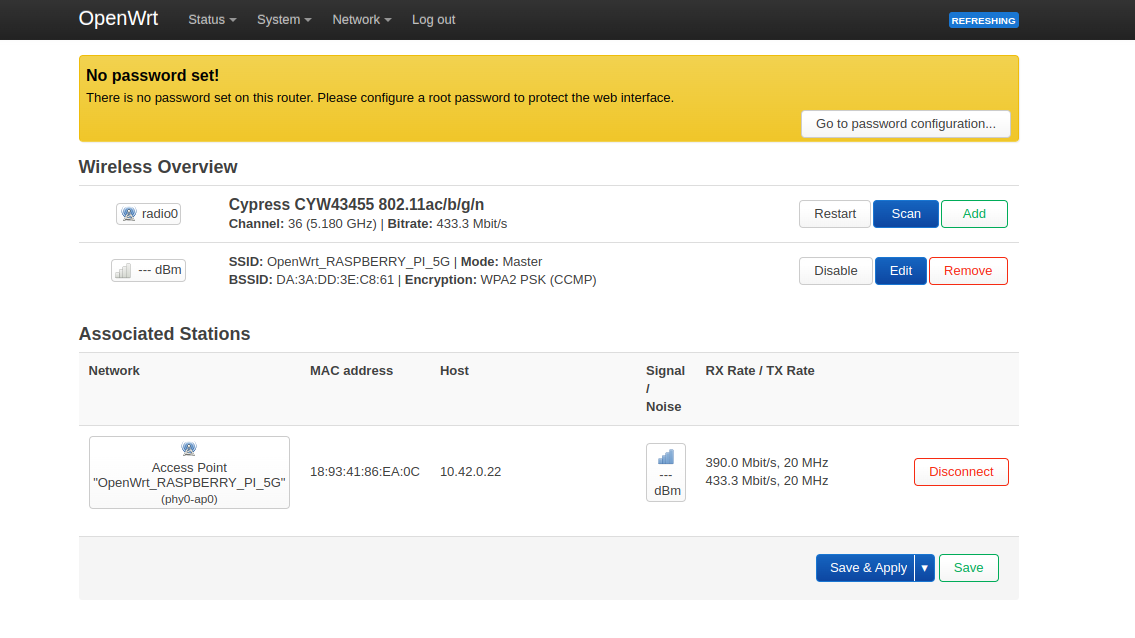
Changing SSID, Encryption, Bandwidth and Channels.
-
WiFi connectivity.
-
Ping between Pi and WiFi client.
-
Ping Google.
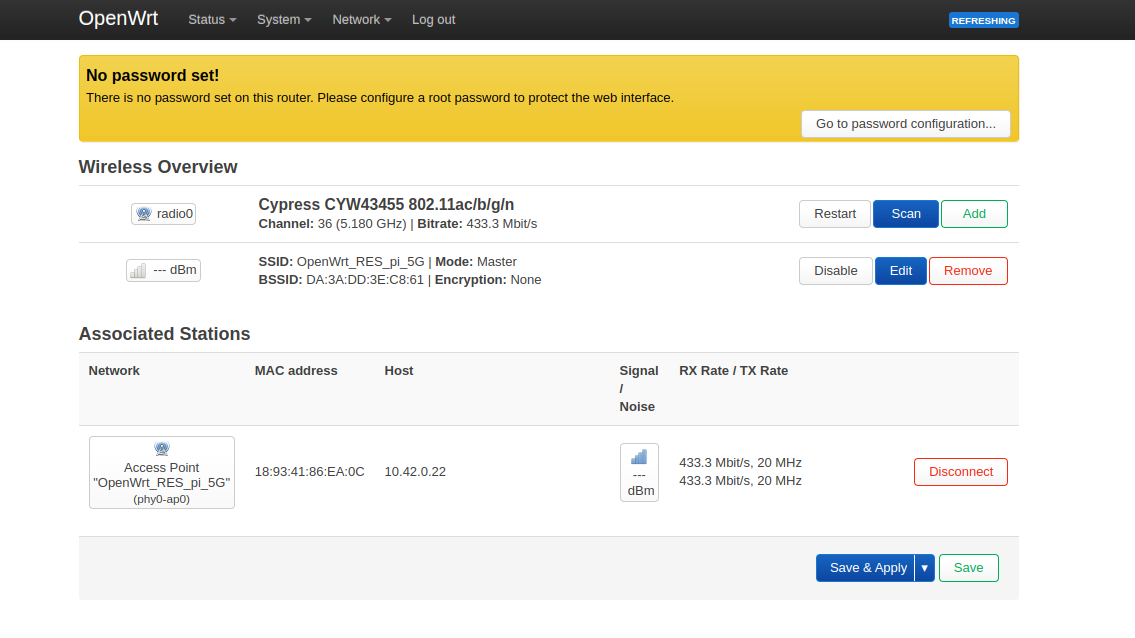
WiFi Configurations
Let us configure the WiFi router parameters through the web GUI of OpenWrt.
From the LAN client connected to RPI, from the web browser, we can open the URL http://<routerip>;, by default it may be 192.168.x.1.
Through webGUI, it is possible to change the SSID as given below
Network Verification
We can start verifying the configuration of device through command line by SSHing into the RPi, from the device connected to it.
The below given commands in RPi console can help to explore the system better.
-
Linux version used in the software 6.6.73 with aarch64-openwrt-linux-musl-gcc
cat /proc/version
cat /etc/os-release-
iw devshows whether radio is up and running; when we did any changes in wireless configuration, it will reflect iniw devoutput.
root@OpenWrt:~# iw dev
phy#0
        Interface phy0-ap0
                ifindex 3
                wdev 0x1
                addr da:3a:dd:3e:c8:61
                ssid OpenWrt_RASPBERRY_PI_5G
                type AP
                channel 36 (5180 MHz), width: 80 MHz, center1: 5210 MHz
txpower 31.00 dBm-
Connect WiFi client to Raspberry Pi and check station dump. In the station dump we can observe WiFi client details, i.e., Clients MAC address, which interface the client got connected etc .
root@OpenWrt:~# iw dev phy0-ap0 station dump
Station 18:93:41:86:ea:0c (on phy0-ap0)
        inactive time:  0 ms
        rx bytes:       244108
        rx packets:     1063
        tx bytes:       362600
        tx packets:     1228
        tx failed:      0
        tx bitrate:     433.3 MBit/s
        rx bitrate:     6.0 MBit/s
        authorized:     yes
        authenticated:  yes
        associated:     yes
        WMM/WME:        yes
        TDLS peer:      no
        DTIM period:    2
        beacon interval:100
        connected time: 39 seconds
current time: 1738624847140 ms-
Ping to google, to ensure the connection.
root@OpenWrt:~# ping -c 2 google.com
PING google.com (142.250.182.110): 56 data bytes
64 bytes from 142.250.182.110: seq=0 ttl=116 time=5.107 ms
64 bytes from 142.250.182.110: seq=1 ttl=116 time=5.992 ms

--- google.com ping statistics ---
2 packets transmitted, 2 packets received, 0% packet loss
round-trip min/avg/max = 5.107/5.549/5.992 ms


root@OpenWrt:~# ping -c 2 8.8.8.8
PING 8.8.8.8 (8.8.8.8): 56 data bytes
64 bytes from 8.8.8.8: seq=0 ttl=116 time=25.376 ms
64 bytes from 8.8.8.8: seq=1 ttl=116 time=3.389 ms

--- 8.8.8.8 ping statistics ---
2 packets transmitted, 2 packets received, 0% packet loss
round-trip min/avg/max = 3.389/14.382/25.376 ms
Conclusion
Raspberry Pi being a low-cost popular board and OpenWrt being open-source software, there exist no limits to exploring them together. This article served to quickly get started with OpenWrt on R-Pi. In the next article in this series, we will look into testing the R-Pi based Wi-Fi router.